
Introduction: A sample is not the end, but evidence for design decisions
Many R&D teams use 3D printing to make samples, and the first goal is to quickly see a physical form. This step is important, but if verification stops at appearance, the value of the sample is easily underestimated. Truly effective sample validation should answer five questions: whether the appearance meets expectations, whether key dimensions are controllable, whether the assembly relationship is smooth, whether functional loads are satisfied, and whether the material and process support the path to later small-batch production or mass production.
lantu3D emphasizes continuous management from blueprint design to physical realization. The sample validation workflow is not simply about printing a model; it is about building an evidence chain around product risks. Every sample should have a clear validation objective, acceptance criteria, and next action.
I. Validation goal layers: do not make one sample do every job
Sample validation should be divided into appearance samples, structural samples, functional samples, and process samples. Appearance samples focus on proportions, curves, grip feel, color, and user perception, and can use high-precision SLA resin or post-painted finishing. Structural samples focus on wall thickness, ribs, snap fits, screw bosses, and assembly clearances, and materials can include tough resin, PA12 nylon, or ABS-like materials. Functional samples need to be close to the real operating environment and may require SLS nylon, MJF nylon, or metal printing. Process samples are used to evaluate the stability and cost of later small-batch production.
If appearance, assembly, and strength are all forced onto one sample, material selection often becomes a compromise. For example, a transparent display piece is suitable for observing internal structures, but not necessarily for withstanding repeated snap-fit assembly and disassembly; a high-toughness material is suitable for functional testing, but may not present the final surface texture. Therefore, defining the role of the sample first is the first step in the validation workflow.
II. Design review: solve 70% of low-level risks before printing
Sample failure is often not a machine problem, but a risk that already exists in the model before printing. Common issues include walls that are too thin, overhang angles that are too large, screw boss roots without fillets, insufficient deformation space for snap fits, assembly clearances that are too small, and closed cavities that cannot be depowdered. Pre-print review should at least check minimum wall thickness, hole compensation, sharp-corner stress concentration, support contact surfaces, and post-processing accessibility.
Using an SLS nylon part as an example, the clearance for moving assemblies is usually recommended to be no less than 0.3 mm to 0.5 mm. For SLA resin appearance parts, thin-wall areas are generally recommended to be above 1.0 mm, and load-bearing areas usually require 1.5 mm or more together with ribs. Metal SLM parts also need to consider support removal, thermal deformation, and machining datums. Moving these rules earlier can reduce rework after printing.
III. Appearance and dimensional verification: replace subjective judgment with standardized records
Appearance verification should not stop at saying a part looks good or bad; standards should be established. Scoring can be based on surface texture, layer-line visibility, edge sharpness, color consistency, paint coverage, and tactile feel. For display parts, A surfaces, B surfaces, and non-display surfaces should be identified to avoid spending too much finishing cost on non-critical areas.
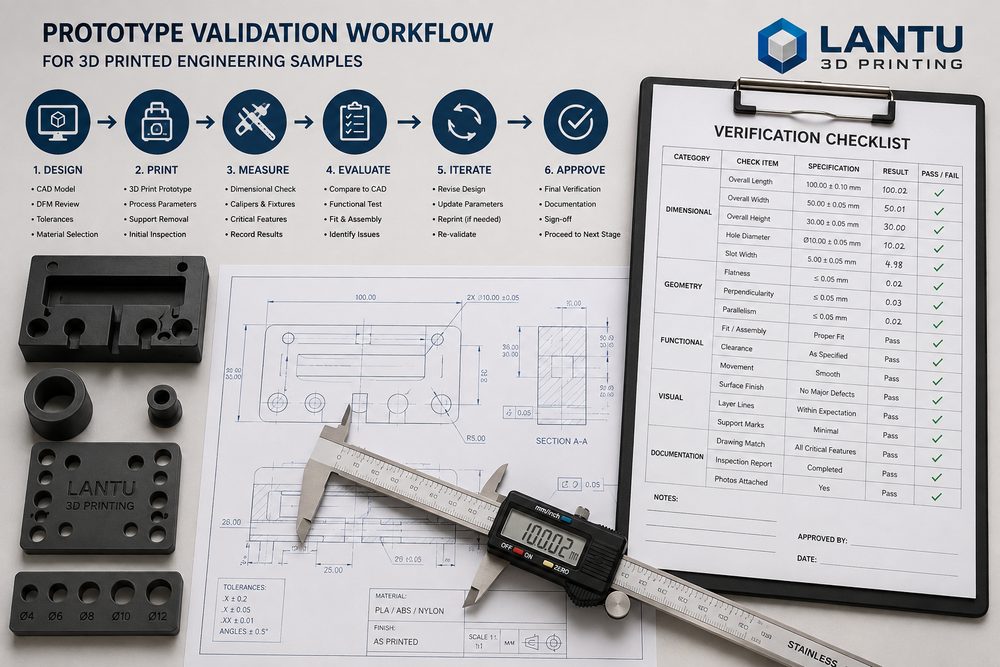
Dimensional verification should focus on key dimensions rather than full-size measurement. These usually include assembly holes, locating pins, snap-fit thickness, sealing surfaces, overall envelopes, and interference positions with other parts. Records should include design value, measured value, deviation, measuring tool, and conclusion. If the deviation has a directional pattern, such as all hole diameters being 0.15 mm too small, a systematic compensation should be made in the next model or process parameter set.
IV. Assembly and functional verification: bring real use scenarios into sample testing
Assembly verification should simulate the real assembly sequence. Many samples look fine on their own, but assembly reveals insufficient screwdriver space, blocked wire-routing channels, difficult snap-fit disassembly, or unclear locating references. It is recommended to perform at least 3 to 5 repeated assembly and disassembly cycles at the sample stage, and record stress whitening, cracked screw bosses, loosened fits, and interference points.
Functional verification must define load, temperature, humidity, contact media, and usage frequency. For example, fixture samples can undergo static load and repeated clamping tests, ventilation parts can undergo airflow resistance and installation vibration checks, and enclosure samples can undergo drop, thermal deformation, and button feel tests. Even if the sample material differs from the final material, relative comparison can still identify weak points in the design.
V. Verification conclusion: every sample round should lead to an executable decision
The validation report does not need to be long, but it must be clear. It is recommended to produce four types of conclusions: pass, pass after modification, process/material change required, or requirements need to be redefined. Each issue should correspond to an actionable item, such as adding a R1.5 fillet, changing snap-fit root thickness from 1.2 mm to 1.8 mm, applying +0.15 mm hole compensation, moving support structures to the inner side of appearance surfaces, or changing post-processing from sandblasting to fine sanding and painting.
When samples move toward small-batch production, process stability verification should also be added. You can first print 3 to 5 parts to confirm consistency, then scale up to 20 to 50 parts. If dimensional drift or post-processing bottlenecks appear in the small-batch stage, go back to adjust the design or process package rather than simply asking the production side to work overtime.
Conclusion: the value of sample validation is to reduce uncertainty in the next step
A high-quality sample validation workflow upgrades 3D printing from a rapid prototyping tool to an R&D decision system. Through layered objectives, pre-print review, standardized measurement, real-scenario testing, and clear conclusions, teams can identify design risks faster, reduce ineffective iterations, and provide reliable evidence for small-batch production or tooling investment.
Submit a model, drawing, image or written notes. Engineers will review material, process, finishing and delivery based on actual use.