
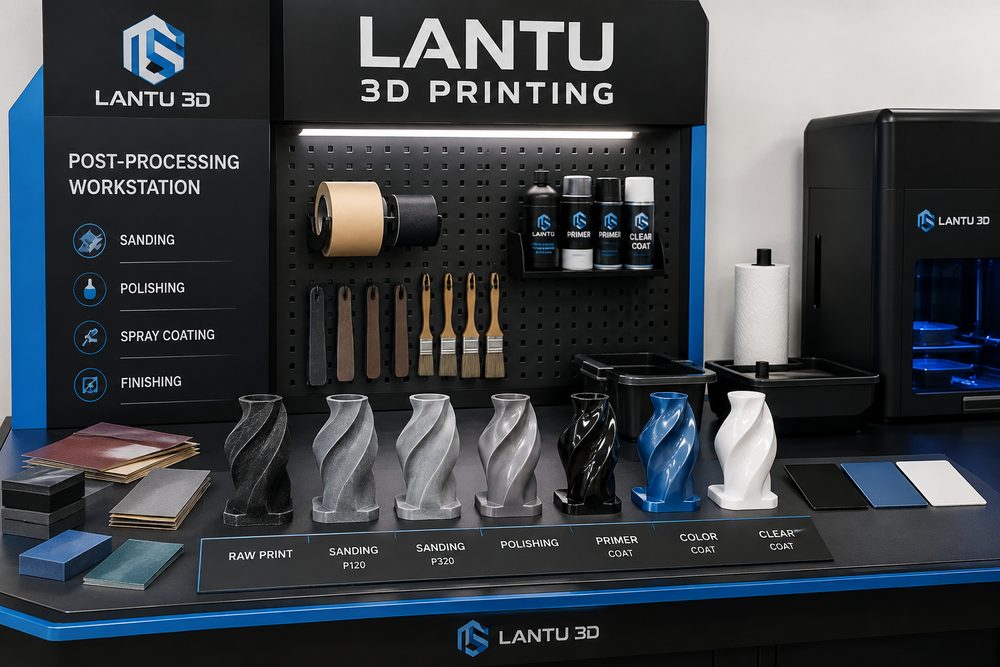
Introduction: The Post-Processing Threshold from “Printable” to “Deliverable”
In 3D printing projects, customers often focus first on build speed and material cost, but the step that truly determines delivery quality usually happens after printing is complete. Support removal, powder cleaning, curing, heat treatment, sanding, sandblasting, dyeing, coating, and dimensional inspection all work together to determine whether a part is ready for presentation, assembly, or small-batch use. Blue Map 3D treats post-processing in project management as a critical process that turns a digital model into a physical delivery, rather than a simple “beautification step.”
For example, if an SLA photopolymer part is not sufficiently post-cured, thin-walled structures may continue shrinking over the following week; if an SLS nylon part is not fully depowdered, powder residue may remain in channels and snap-fit features and affect assembly; if a metal SLM part has an unstable heat-treatment curve, internal residual stress may cause machining datum shifts. For samples that require assembly, the post-processing plan must be included during quotation and design review, rather than being handled as a last-minute fix after printing.
1. Applicability Boundaries of Common Post-Processing Methods
SLA and DLP resin parts typically require alcohol cleaning, secondary UV curing, support-tip trimming, and surface coating. Transparent parts may also require step-by-step sanding, clear coating, or polishing. SLS nylon parts commonly go through cooling, depowdering, sandblasting, dyeing, and infiltration; if they are used for functional validation, special attention should be paid to hole diameters, snap-fit elasticity, and threaded insert areas. FDM parts have obvious layer lines and are well suited to rough sanding, filler, primer, and spray painting to improve appearance, but thick coatings should be avoided on mating surfaces where dimensional accuracy is critical.
Post-processing for metal printing is closer to engineering manufacturing and often includes support removal, heat treatment, wire EDM, CNC finishing, sandblasting, shot peening, anodizing, or passivation. Taking Ti6Al4V titanium alloy as an example, heat-treatment temperature, holding time, and cooling method all affect microstructural stability; for load-bearing structures, key batch records and inspection reports should also be retained. Post-processing is not a case of “the more, the better” for different materials. Excessive sanding may damage thin walls, and overly thick coatings may affect fit clearances.
2. How Post-Processing Feeds Back into Design
Post-processing occupies space, changes surface conditions, and introduces dimensional variation, so process allowances must be reserved during the design stage. Appearance parts that require coating should reserve 0.1-0.3 mm of clearance at snap-fits, rotating shafts, and assembly grooves; flat surfaces that need sanding should avoid designing locating ribs that are too thin; internal cavities that need depowdering should include sufficient powder-release holes and avoid long blind holes. For transparent parts, support points should be kept away from the main visual surface whenever possible, because polishing cannot fully remove deep support marks.
When reviewing models, Blue Map 3D usually classifies post-processing risks into three categories: appearance risk, assembly risk, and strength risk. Appearance risk focuses on coating uniformity, color difference, and layer lines; assembly risk focuses on coating thickness, powder residue, and insert position; strength risk focuses on heat treatment, damage from support removal, and surface microcracks. Raising these issues before model approval helps reduce rework and reprinting.
3. Practical Process Control Methods
First, establish a part-level process sheet that records material, layer thickness, build orientation, post-processing steps, key parameters, and inspection results. Second, apply three-point control for critical dimensions: prediction before printing, measurement before post-processing, and remeasurement after post-processing, so that deviations are not only visible in the final result but also traceable to their source. Third, for appearance parts, make small-area color or texture samples to confirm customer acceptance criteria before processing the full part. Fourth, set up first-article approval for batch parts, especially for dyeing, coating, and heat-treatment lots.
In delivery communication, the differences between “printed raw-color parts,” “basic-sanded parts,” “presentation-grade coated parts,” and “engineering-grade machined parts” should be made clear. Each level corresponds to different costs, lead times, and acceptance criteria. If a customer only needs structural verification, overly intensive appearance finishing adds unnecessary cost; if the part will be used for exhibitions or proposal presentations, surface detail, color, and tactile quality directly affect the professional image.
4. Quality Inspection and Risk Warnings
After post-processing, appearance, dimensional, and functional inspections should all be performed. Appearance inspection includes color difference, particles, runs, scratches, and support residue; dimensional inspection includes critical hole positions, mating surfaces, snap-fit thickness, and datum planes; functional inspection includes insertion, rotation, load-bearing, sealing, or installation tests. For functional parts intended for long-term use, changes caused by temperature and humidity, ultraviolet exposure, chemical media, and repeated loading should also be considered.
Common risks include resin parts becoming brittle due to over-curing, nylon parts changing slightly in size after dyeing, metal parts leaving stress concentration points during support removal, and coating layers obscuring small text or textures. The effective approach is not to promise “zero risk,” but to move risk forward into design and process review and reduce uncertainty through verifiable steps.
Conclusion
Post-processing determines whether a 3D printing project can move from a formed part to a deliverable part. For Blue Map 3D, post-processing is not an isolated operation, but a lifecycle management link that connects design review, material selection, printing parameters, quality inspection, and customer acceptance. Only by incorporating post-processing into the plan from the outset can stable balance be achieved among cost, lead time, appearance, and functionality.
Submit a model, drawing, image or written notes. Engineers will review material, process, finishing and delivery based on actual use.